Did you like the rainbow skirt? I hope so! I really really like it. But I'm also pretty partial to the little snails tank top that I made to go with it.
I just grabbed a little white tank that I got at Target a while back. It has this cute little bow detail on one shoulder.
Then I grabbed my tonal chevrons and went to work, appliqueing some snails... because even girls can like snails, right? After I ironed them on and stitched around them, I decided their shells needed a little detail. So I swirled 'em.
Don't be surprised when you see Noelle and Brooks sporting some snail shirts, too! :)
Showing posts with label animals. Show all posts
Monday, September 3, 2012
Friday, August 24, 2012
Mermaid Tail... the tale of a mermaid pants!
A lot of the clothes I make are inspired by the little people in my life, like the butterfly shirt...
... and the owl jumper...
And when the owl jumper didn't cut it, the giraffe jumper...
But it's not just my little people who inspire me. These pants are made with our little friend, Gracie, in mind. Gracie LOVES mermaids. Loves 'em. So I thought it would be fun to whip up some mermaid pants.
As I was brainstorming, the only issue I could see was the fact that I would be making pants and mermaids do not have legs. That really is the only problem with mermaids; am I right?! :) But I think we got around that pretty well... I think.
Happy swimming! :)
... and the owl jumper...
And when the owl jumper didn't cut it, the giraffe jumper...
But it's not just my little people who inspire me. These pants are made with our little friend, Gracie, in mind. Gracie LOVES mermaids. Loves 'em. So I thought it would be fun to whip up some mermaid pants.
As I was brainstorming, the only issue I could see was the fact that I would be making pants and mermaids do not have legs. That really is the only problem with mermaids; am I right?! :) But I think we got around that pretty well... I think.
Happy swimming! :)
Tuesday, August 14, 2012
Whoooo's Surprise Birthday Dress
I've spent the last couple days in the hospital with sweet Brooksy-boy. He woke up on Sunday morning, wheezing and generally inconsolable. He's home now and fine, and I'll fill you in more later, but whew... It was quite a ride. Glad to be home.
And I'm glad to be able to share this little dress that I made for my niece, Hannah, who just turned THREE!
When I first decided to make Hannah a dress, I actually thought to myself, Well, Heather... I guess you're THAT aunt-- the weird one who only gives clothes, and handmade clothes at that. Sorry, kids, my sister-in-law will say, just smile and say 'thank you.' However, when I brought this dress upstairs, BOTH my girls jumped up and asked, "Is that for me!?!" So, YES! This gift is a winner.
It starts off like this: just a navy and white polka dot dress with a random tree appliqued on it and a pocket...
... but then, out of said pockets pops a little owl to take along!
He can either stay hidden safely away in his pocket or he can journey over to his hole in the tree to rest and look out on the world.
And he's attached to a ribbon, so he's a take-along toy that can't get lost.
Hannah wore her dress to church on Sunday and loved it. See! THIS aunt's not weird!
(Quiet, peanut gallery!)
:)
And I'm glad to be able to share this little dress that I made for my niece, Hannah, who just turned THREE!
When I first decided to make Hannah a dress, I actually thought to myself, Well, Heather... I guess you're THAT aunt-- the weird one who only gives clothes, and handmade clothes at that. Sorry, kids, my sister-in-law will say, just smile and say 'thank you.' However, when I brought this dress upstairs, BOTH my girls jumped up and asked, "Is that for me!?!" So, YES! This gift is a winner.
It starts off like this: just a navy and white polka dot dress with a random tree appliqued on it and a pocket...
... but then, out of said pockets pops a little owl to take along!
He can either stay hidden safely away in his pocket or he can journey over to his hole in the tree to rest and look out on the world.
"Hey, guys!"
And he's attached to a ribbon, so he's a take-along toy that can't get lost.
Hannah wore her dress to church on Sunday and loved it. See! THIS aunt's not weird!
(Quiet, peanut gallery!)
:)
Tuesday, June 19, 2012
We're Gonna Need a Bigger Boat
This is sweet Riley, in all her sprinkler-hair, leftover-snack glory:
And when I call her sweet, I mean it. She has a beautiful and sensitive heart. And her favorite animal is the shark. Specifically, THIS shark:
As we read through her shark book (specifically chosen, by her, for a birthday present), this is the shark she picked as her favorite. This from the girl who tells her sister, "Don't smush that ant, Noelle! God made him, too!" Of course she likes the terrifying sea creature who, in the words of this page, "wait[s] for the right time to attack..."
All this to say, I had to make her a shark skirt. I know what you're thinking-- "Whoa! What a realistic portrayal of that shark! You are a genuine artist!" Thanks. I do what I can. And really, that's all I can do. :)
Here he is, in fabric form. Again, don't be scared. This isn't the real thing, even though he does have 3-D teeth!
See!? I mean, I learned that sharks can have thousands of teeth in their lifetimes, so I may as well emphasize those "toophers", right? And for a little added interest, I used knit for the shark and corduroy for his pupil, so we've got some varying textures going on.
After all that, you may be wondering why Noelle is modeling the shark skirt. When I enthusiastically unveiled it to Riley, she said, "No, I don't want that."
Figures.
And when I call her sweet, I mean it. She has a beautiful and sensitive heart. And her favorite animal is the shark. Specifically, THIS shark:
As we read through her shark book (specifically chosen, by her, for a birthday present), this is the shark she picked as her favorite. This from the girl who tells her sister, "Don't smush that ant, Noelle! God made him, too!" Of course she likes the terrifying sea creature who, in the words of this page, "wait[s] for the right time to attack..."
All this to say, I had to make her a shark skirt. I know what you're thinking-- "Whoa! What a realistic portrayal of that shark! You are a genuine artist!" Thanks. I do what I can. And really, that's all I can do. :)
Here he is, in fabric form. Again, don't be scared. This isn't the real thing, even though he does have 3-D teeth!
See!? I mean, I learned that sharks can have thousands of teeth in their lifetimes, so I may as well emphasize those "toophers", right? And for a little added interest, I used knit for the shark and corduroy for his pupil, so we've got some varying textures going on.
After all that, you may be wondering why Noelle is modeling the shark skirt. When I enthusiastically unveiled it to Riley, she said, "No, I don't want that."
Figures.
Tuesday, January 17, 2012
Giraffe Jumper Tutorial
Pin It
Ask and you shall receive! Rileydemanded politely requested a giraffe jumper, and here it is! The super cool thing about this one is that you could make pretty much any animal you want. Actually, if you have any requests or suggestions, I'd be happy to try them out!! :)
Materials:
About 1/2 yard main skirt fabric and straps
1/4 yard fabric for head and neck
Fabric scraps for eyes, "nose", and horns
Steam a Seam
Snaps/buttons
Giraffe pattern, found here
Sewing gear
Instructions:
This little number is basically a cute little jumper with a giraffe smacked on it, so it's really pretty simple. I do take a few shortcuts which, I think, make it a little easier. So let's start with the simple part-- the jumper base!
First, cut out your pieces. Your skirt will be the width of your fabric by the length you want plus 1 inch (for hemming and seam allowance). I want my skirt 15 inches, so I cut out a piece that is width of fabric by 16 inches. Also cut your bodice piece. This should be 12 inches by your waist measurement plus 1 inch. I wanted my waist to be 23 inches, so I cut it 12" x 24". When you get that cut, stitch the short sides together then fold it over, wrong sides together. Not a great pic, but hopefully you get the idea. Make sure your raw edges are lined up, press and then topstitch close to the fold (which will be the top of your bodice piece).
Now you need to cut out the giraffe's neck. Fold your fabric in half and then cut an angle that starts at 1.5" and angles out to 3", like so...
It'll look like this when you open it up.
Now we need to scalloped edge of the giraffe's neck. Cut a strip 2 inches wide and long enough to extend down the giraffe's neck. Iron some Steam a Seam to the wrong side of the fabric (with the backing still on!).
** see my owl tutorial for Steam a Seam tips!**
Place it slightly under the neck piece. Then just draw some scallops. They don't have to be perfect; have you ever seen a perfectly scalloped giraffe in real life? ;)
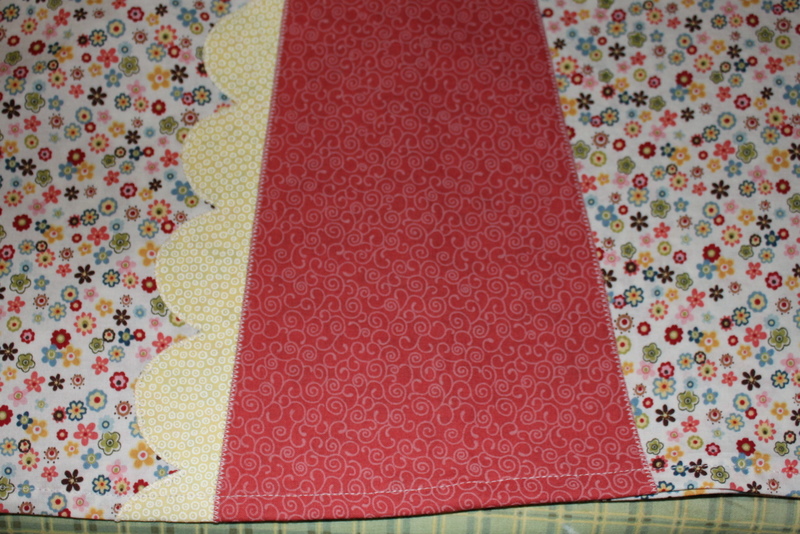
Cut those scallops out. Now you have a couple options for the neck-- you can pin it in place or use Wonder Tape or Steam a Seam. It's up to you. Position both pieces, covering the seam of your skirt piece (no seam showing! Nice!!). Iron the scallops in place. Then zig-zag stitch over the neck and scallops.
Turn your the bottom 1/4 inch to the wrong side, then a quarter inch more. Press and stitch to finish your hem.
Now, run a gathering stitch along the top edge of your skirt piece, without stitching the giraffe neck (you want that to stay flat).
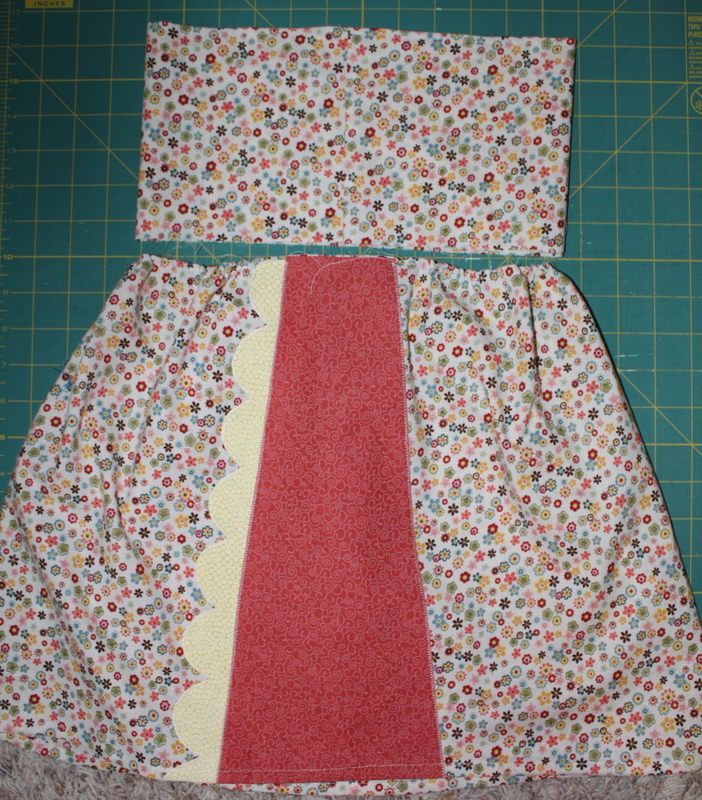
Gather the skirt in until it's the same width as your waist piece. Flip the waist piece down, lining up the seam (that seam will be covered, too!) and all the raw edges and stitch. Then finish those raw edges off with a zig-zag stitch or serger.
Flip that waist piece up and you have this!
"But wait!" you say, "There are no straps! Come on, Heather!" Here's one of my cheats, so it's easier to get the strap positioning. See, the front and center of your bodice piece is going to be covered by the giraffe's face, so we can just sandwich the straps in between the bodice and the giraffe head.
Cut two pieces of fabric, 3 inches by 26 inches. These will be your straps. Fold them right sides together (so they're 3" x 13"), stitch up the sides and flip them right side out. Then press.
You have that seam to show you the center of the bodice piece, so, using that, place your straps so they angle out slightly. These won't show, remember. I zig-zagged the bottom and then did a little topstitching that lined up with the stitch I did on the bodice. Click the picture for a better look.
Now to the fun part! That cute giraffe face!
Cut out your pattern pieces. To add the details to aforementioned cute little giraffe face, we're just going to do some basic applique. Again, see the owl jumper tutorial for my applique tip (but look there BEFORE cutting your fabric!!). Place the "nose" and eyes on your main front face piece. Iron them on and zig-zag stitch for a finished look.
See how my nose didn't totally line up (crummy cutting on my part). That's fine! Once you get the backing on, you won't see it.
Stitch the two backing pieces together, leaving an opening of 1.5" in the center. You'll use this to turn the face right side out.
Press flat.
Cut out your ears and horns. Sew them, right sides together. Flip and topstitch.
Now place them on the face, like this:
Cover all that with the backing, making sure that you have the horns and ears pinned in place. Then stitch all the way around!
Turn it right side out, using that hole you left the backing.
Press flat. No need to stitch up the hole as it won't show. DO NOT TOPSTITCH around the edge yet, though.
First, you need to place the head on your bodice. See how the edges of the straps, the bodice seam and the hole in the head backing are all hidden now? Awesome. NOW pin your face in place... I'm a rhymer, and I didn't even know it! ;)
Topstitch around the face. Voila!
Grab your snaps or buttons and put them on, according to the manufacturer's instructions. I put the dress on Riley and marked where I wanted them. Sorry for the lack of pictures. Let me know if you need clarification.
After you get that done, YOU'RE done! It's great on it's own or over a shirt and/or leggings!
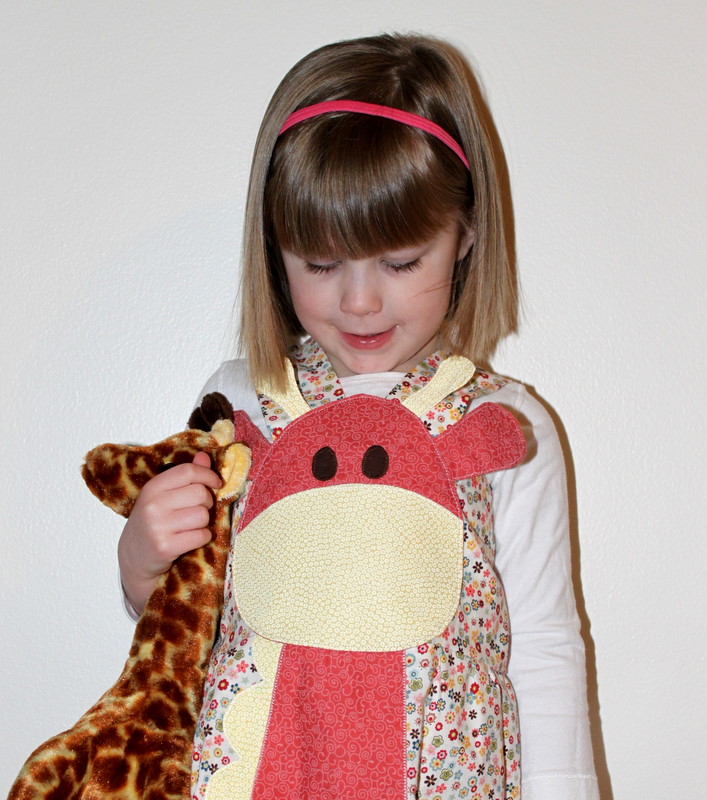
And it's even better when you have a giraffe friend. :)
Linked up at...

Ask and you shall receive! Riley
Materials:
About 1/2 yard main skirt fabric and straps
1/4 yard fabric for head and neck
Fabric scraps for eyes, "nose", and horns
Steam a Seam
Snaps/buttons
Giraffe pattern, found here
Sewing gear
Instructions:
This little number is basically a cute little jumper with a giraffe smacked on it, so it's really pretty simple. I do take a few shortcuts which, I think, make it a little easier. So let's start with the simple part-- the jumper base!
First, cut out your pieces. Your skirt will be the width of your fabric by the length you want plus 1 inch (for hemming and seam allowance). I want my skirt 15 inches, so I cut out a piece that is width of fabric by 16 inches. Also cut your bodice piece. This should be 12 inches by your waist measurement plus 1 inch. I wanted my waist to be 23 inches, so I cut it 12" x 24". When you get that cut, stitch the short sides together then fold it over, wrong sides together. Not a great pic, but hopefully you get the idea. Make sure your raw edges are lined up, press and then topstitch close to the fold (which will be the top of your bodice piece).
It'll look like this when you open it up.
Now we need to scalloped edge of the giraffe's neck. Cut a strip 2 inches wide and long enough to extend down the giraffe's neck. Iron some Steam a Seam to the wrong side of the fabric (with the backing still on!).
** see my owl tutorial for Steam a Seam tips!**
Place it slightly under the neck piece. Then just draw some scallops. They don't have to be perfect; have you ever seen a perfectly scalloped giraffe in real life? ;)
Cut those scallops out. Now you have a couple options for the neck-- you can pin it in place or use Wonder Tape or Steam a Seam. It's up to you. Position both pieces, covering the seam of your skirt piece (no seam showing! Nice!!). Iron the scallops in place. Then zig-zag stitch over the neck and scallops.
Turn your the bottom 1/4 inch to the wrong side, then a quarter inch more. Press and stitch to finish your hem.
Gather the skirt in until it's the same width as your waist piece. Flip the waist piece down, lining up the seam (that seam will be covered, too!) and all the raw edges and stitch. Then finish those raw edges off with a zig-zag stitch or serger.
Flip that waist piece up and you have this!
"But wait!" you say, "There are no straps! Come on, Heather!" Here's one of my cheats, so it's easier to get the strap positioning. See, the front and center of your bodice piece is going to be covered by the giraffe's face, so we can just sandwich the straps in between the bodice and the giraffe head.
Cut two pieces of fabric, 3 inches by 26 inches. These will be your straps. Fold them right sides together (so they're 3" x 13"), stitch up the sides and flip them right side out. Then press.
You have that seam to show you the center of the bodice piece, so, using that, place your straps so they angle out slightly. These won't show, remember. I zig-zagged the bottom and then did a little topstitching that lined up with the stitch I did on the bodice. Click the picture for a better look.
Now to the fun part! That cute giraffe face!
Cut out your pattern pieces. To add the details to aforementioned cute little giraffe face, we're just going to do some basic applique. Again, see the owl jumper tutorial for my applique tip (but look there BEFORE cutting your fabric!!). Place the "nose" and eyes on your main front face piece. Iron them on and zig-zag stitch for a finished look.
See how my nose didn't totally line up (crummy cutting on my part). That's fine! Once you get the backing on, you won't see it.
Stitch the two backing pieces together, leaving an opening of 1.5" in the center. You'll use this to turn the face right side out.
Press flat.
Cut out your ears and horns. Sew them, right sides together. Flip and topstitch.
Now place them on the face, like this:
Cover all that with the backing, making sure that you have the horns and ears pinned in place. Then stitch all the way around!
Turn it right side out, using that hole you left the backing.
Press flat. No need to stitch up the hole as it won't show. DO NOT TOPSTITCH around the edge yet, though.
First, you need to place the head on your bodice. See how the edges of the straps, the bodice seam and the hole in the head backing are all hidden now? Awesome. NOW pin your face in place... I'm a rhymer, and I didn't even know it! ;)
Topstitch around the face. Voila!
Grab your snaps or buttons and put them on, according to the manufacturer's instructions. I put the dress on Riley and marked where I wanted them. Sorry for the lack of pictures. Let me know if you need clarification.
After you get that done, YOU'RE done! It's great on it's own or over a shirt and/or leggings!
And it's even better when you have a giraffe friend. :)
Linked up at...
Subscribe to:
Posts (Atom)