
It's the post we've all been waiting for! Well, all of us, minus Riley, who still really wants a giraffe jumper. We'll see...
Since this is a jumper, let's (ahem) jump right in.
Materials:
Approximately 1 yard main fabric
Approximately 1 yard underskirt/lining fabric
Scrap fabric for eyes, beak and pocket (if you want it)
2 snaps or buttons
Steam a Seam
Pattern pieces, found here and here
Basic sewing gear
My measurements will be for a 3T/4T jumper. Riley is fairly average height but is a twig. My waist ends up being 22 inches with a length of 24 inches, from shoulder to hem. The great thing about this pattern, though, is that it's ridiculously easy to modify. The only thing to change is the size of your back strip of fabric that makes up the back of the bodice (just a rectangle!) and the length of the straps and skirt. So simple.
Instructions:
Cut out your pieces for the bodice (one front, one back, two "ear-things" and two straps (2 inches by 20 inches).

Also cut out the eyes and beaks to applique. I used a spool of thread and a plastic cup (with about a 3-inch diameter). And I just freehanded the beak. BUT WAIT! Before you cut, here's my tip for Steam a Seam and applique: First trace your shape onto the fabric.

Then cut around the shape but leave room. Keeping the backing on the Steam a Seam, place the fabric on the "sticky" side. Look closely at the picture below to see my circles.

Cut the Steam a Seam so that there's none sticking out from the edges. You do not want that stuff on your iron. Blech.

Iron the fabric to the Steam a Seam. It won't adhere to your board because you still have the paper backing on it.

Just peel the backing off and place it where you want it.

Then iron!

Next, zig-zag stitch around your eyes and beak for added security and a nice, finished look.

Now grab your straps. Fold them over and stitch just the long sides, using a 3/8 inch seam allowance (the edge of your presser foot).


Trim the edge that's folded over, so when you turn it right side out, it will be less bulky.

Turn right side out and press.

Now begins the assembly, which is the trickiest part... and it's not all that tricky. Yay!
Place the straps in the middle of each of the extended portions of the back bodice, like so.

Then cover them with the "ears" or "horns." (That's right... I googled it. They're referred to in both ways.)

Sew across.
Notice how the one on the right doesn't line up as nicely? Oops. But if this happens to you, don't worry. It doesn't matter. It just needs to be good enough. Let's clamp down on our Type A personalities and embrace that imperfection. :)

Clip the edges of the seam.

Then press both the strap and seam down toward the bottom, keeping the owl horn up.

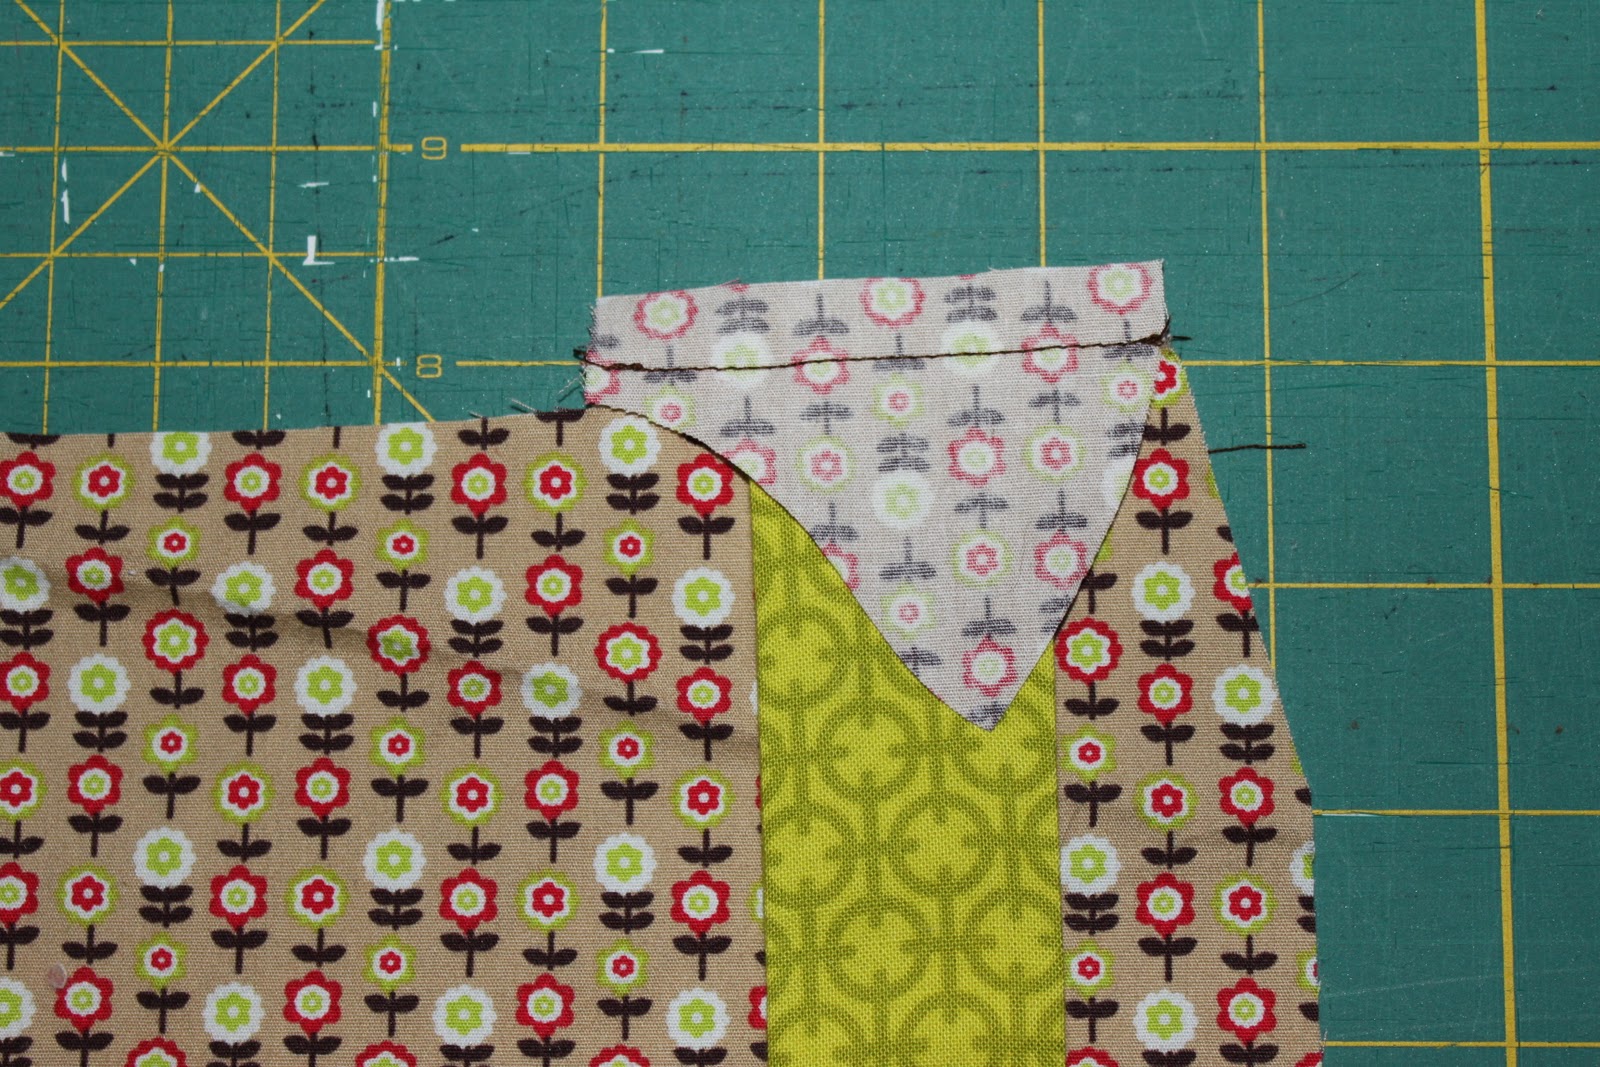
Now place the front bodice on top, right sides together. Put it aside for just a brief moment while we get the back of the bodice ready.

The back is just a strip of fabric, 8 inches by 14.5 inches (for me), folded and pressed to be 4 inches by 14.5 inches. Then top stitch close to the fold.

You're going to sandwich the back in between the two bodice pieces. You'll have to fold it up a little to make it fit.

Stitch it all up, using a 3/8 inch seam allowance! **When you get to the sides of the horns, make sure that you're not stitching over the straps, too. You want them to fold up nicely.**

Clip the top of the horn. Then turn and press.

Oh my word, you say to yourself! Look at that! My daughter is going to rock this owl! Then you top stitch around that cute owly face.

Bodice DONE! And it's the toughest part; trust me.

Moving on to the skirt. If you're adding a pocket, make that now. Take your pocket pattern piece. Finish the sides and bottom with a zig-zag stitch or serger.

Then fold those edges to the wrong side and press. The corners take a little finagling, but you can do it.

I didn't take a picture, but fold the top 1/4-inch to the wrong side, then another 1/4-inch. Press and stitch.

Sew your underskirt piece, right sides together, along the short ends, creating a big ol' loop. Zig-zag or serge.

Hem it by pressing over a 1/4 inch then another 1/4 inch. Stitch. Turn right side out.

Find the front center of the underskirt and position your pocket, about 3 inches from the hem. Pin pocket in place.

Stitch around the sides and bottom. Easy as pie.

The overskirt...
I didn't create a pattern piece for this, but grab your four 8" x 16" pieces, two main pieces and two lining. Place the main and lining pieces, right sides together, and draw a curve like this. Then cut.

Sew pieces together, ONLY along the curve.

Now you're going to line up the curve with the rectangle part of the overskirt. Line up at the top.

You'll see that the rectangle is longer than the curved wing part. **Note: After I made mine, I adjusted the pattern, so there's more discrepancy. You'll have about 1/2-inch difference.**

Pin wings to rectangle, right sides together.

Stitch up the sides and finish with a zig-zag stitch or serged edge.

Now, take that leftover part along the bottom and fold it over. You'll be folding it over twice (remember my change?). Press.

Now top stitch the whole thing, sides and bottom.

Center underskirt on the overskirt, right side to wrong side. Pin overskirt around the underskirt.


Stitch skirts together with a gathering stitch. Then gather them in until they are the same measurement as your bodice piece.

Flip bodice piece inside-out and center it. Pin and stitch.

Finish with a zig-zag or serge and now it's time for the BIG REVEAL!!!

Gasp! It looks great... but now you just have to do the snaps. Sorry. No pics. Basically, you apply the snaps like the manufacturer says. They'll come in toward the center a little. You could also do buttons, if you'd prefer.


But wait! It's even better on a kid! (Of course it is.) And that pocket is super fun. I had to keep pulling toys out of it while snapping pictures. :)


Versions 1 and 2. Same bodice, different skirt. I'll post a quick tutorial on version 1.0 soon. It's much simpler, if you're looking for that.


Please let me know if any step is unclear! I'm just starting in the tutorial biz. :)
O, my goodness! What vision you have! I could have never come up with this. And I so can hear my daughter asking me to make her something like an "owl dress" when she was a size 3/4. I would panic and tell her I couldn't do it- ha! And a giraffe?? U going to try that, too? WOW, you have talent!!!!
ReplyDeleteThanks, Kate! Love your blog, by the way! And did you see the giraffe dress? I got it done, and Riley was super pleased (phew!). :)
DeleteThis is absolute perfection! I love owls like none other, so I feel in love the moment I saw this. I am not the best sewer, so we will see if I will be able to do this for my little one! Thanks so much for sharing!
ReplyDeleteYou can totally do it! And I'll be posting a less labor intensive skirt, too! :) We love our owls, too!
DeleteSuper cute jumper!! ^.^
ReplyDeleteBtw, I'm hopping by from Friday Fun Finds and hope you'll join my Winter Blog Hop, too.
Oh wow, super cute!!! I am your newest follower! My goal is to learn to sew this year. Thank you for the great tutorial. It's definitely bookmarked for future reference! I'm always on the hunt for new girly patterns (to try out when I learn!)
ReplyDeleteThank you SO much for stopping by and leaving me a sweet comment!
Warning... I am a testimony to the fact that seeing can be ridiculously addicting! :) Let me know if there's anything specific you'd like a tutorial for! I'm always excited about new ideas! :)
DeleteTruly adorable and your little owls look just precious in them.
ReplyDeleteI LOVE OWLS! This is adorable! Thank you for linking up at Fine Finds Friday!
ReplyDeleteMandy |smallfineprint|
www.smallfineprint.com
That is adorable thanks for sharing @CountryMommaCooks Link & Greet Party.....hope to see you next weekend...have a great day!
ReplyDeleteI have never seen an owl dress before. Little girls would just LOVE this!!! Thanks for sharing such a comprehensive tutorial. I would love for you to link this up to my ongoing linky that's exclusively for girls' dresses... http://threadingmyway.blogspot.com/2012/01/threading-your-way-dresses-for-girls.html
ReplyDeleteThanks so much for linking up...
DeleteThis is so cute! I wish I could sew. Good thing my mom can so I can pass this along for her to make! :)
ReplyDeleteI'd love for you to link up and share: http://tutusandteaparties.blogspot.com/2012/01/pinteresting-party-week-twenty-two.html
This is super cute,my daughter would love it :-)
ReplyDeleteI'm so very impressed! Owls are very in, aren't they? This is an amazing creation, well done! (and thank you for the tutorial!!)
ReplyDeleteHi Heather, I've featured your dress today... http://threadingmyway.blogspot.com/2012/01/threading-your-way-features_21.html
ReplyDeleteOh boy! Oh boy!! Thank you, Pam!
DeleteNo way... NO WAY! I can't believe my eyes, this must be the sweetest thing ever. It should come in little sachets to sweeten your tea with. I actually just squealed with pure glee when I saw it, and I can neither sew nor do I have any kids. How generous of you to share this, I reckon you could quite easily make a fair deal of money with the pattern. Amazeballs! Gonna stick it on my pinterest, in case someone takes pity on me and wants to make one for a slightly (...) overweight 33 year old nutcase?
ReplyDeleteHi Heather
ReplyDeleteI would love to make this fantastic jumper for my little one, but cannot dowload the pattern pieces. It says that they are either not there or I do not have permission to view them. Could it be that you did not set the permissions to be viewed by all?I would love if you could check on this or just email me the pattern pieces. I have the fabric ready:) kasia_hanack@yahoo.com
Thanks, kasia! I fixed the problem! I'm so excited for you to make an owl!! Let me know if you have any questions! :)
DeleteLove this! Super cute tutorial! I've pinned it to try out later. Thanks so much for sharing!
ReplyDeleteYour jumper is SO well-designed and just plain.darling! I love both versions too!
ReplyDeleteThis is adorable! Going to pin this to make in the future. Thanks for sharing this with us:)
ReplyDeleteReally, really cute... And how great that you want to share it, I think that I'll make one for my daughter..........
ReplyDeleteThank you for sharing!!
? Do I just print this out on regular 8 1/2 " paper to get the right size pattern?
ReplyDeleteYep! That should work! Let me know if you have any questions! :)
DeleteCan this be adjusted for an 8 year old??
ReplyDeleteThank you for making this tutorial - just made this for my daughter and I think when she wakes up from her nap she's going to be quite thrilled! Thanks for sharing. (Found you via pinterest)
ReplyDeleteHi there, I love love love your owl dress and I will attempt to make it. However I am not a great sewer and therefore I need some clarification. First of all.... Are the pieces that are on the pdf the right size??? They look small to me.Secondly, I have no idea how you sandwiched the back between the two front pieces and came out with the result that you did. Can you explain that a bit better to me? thanks so much
ReplyDeleteFrauke
Hi sorry, this is Frauke again, sorry, also what is a gathering stitch, is that something that you have on your sewing machine or do I need to do that??? Sorry I don't know how else to publish other then anonymous. I would love to hear from you cause I am just learning to sew and I have a 3+4 year old and I would love to make them a dress like this.
ReplyDeleteHi there!
ReplyDeleteI'm writing you now only to tell you that I've featured your Owl Jumper 2.0 on my blog on a roundup of free patterns and tutes for girl's dresses (FALL edition), you can find it here: http://sergerpepper.blogspot.it/2013/09/free-pattern-girls-dresses-fall.html
I hope there's nothing wrong with it, if you have any problem about it, just tell me and I'll delete it!
Thank you so much,
MammaNene @ SergerPepper
My daughter wants to know if this can be made in a size 16 girls? She is 9 but really tall for her age 4'4"! She loves this! Me too!
ReplyDelete