Even while I was making the tutorial for the Bubble it Up Dress, I wanted to design a different bubble dress, but I felt like I had to get the tutorial for the original one up, too. So, yep yep yep, here's the second version!
Since it's the second version, I called it the double bubble... not because there are two bubbles. Don't get confused. It does have a super cute crossover back, though!
And look at that fabric!! I've been saving it because I love it so much, and then it hit me-- balloons are perfect for a bubble dress! And Riley loves that there are little bunnies holding onto some of the balloons. And I quote: "Bunnies?! Holding balloons? That's silly!!" :)
Whatcha Need:
front piece and back piece patterns (why I couldn't save them as one file? dunno.) in size 4T
about 1.25 yards main fabric (more for larger than 3T/4T)
about .75 yard lining fabric
5 coordinating buttons
general sewing stuff
Instructions:
Cut out your pattern pieces: 2 of front piece (one main and one lining), 4 of back pieces (2 main, 2 lining), and skirt pieces.
To get the measurements for your skirt pieces, you want to decide how long you want it. Add 3 inches to that length for the length of your main piece. Cut 2 pieces that length x 30 inches wide. For lining, cut length minus 3 inches x width of fabric (selvage to selvage). My main is 16 inches long, my lining is 10.
Let's start with the bodice. Sew shoulders of your main front piece and main back pieces (I used the same fabric for main and lining). Do the same with your lining.
Sew main piece to lining piece, around the neckline and the armholes, but DO NOT sew the side seams. Clip the curves. Turn.
Place sides together, lining up the seam, right sides together. Sew up the sides.
Turn right side out and press. Then topstitch around the neckline and arms.
Place your bodice flat and overlap the back pieces, so they are the same width as the front piece. Baste them in place. Now you can set that aside while we focus on the bubble!
Sew the side seams of your main fabric, right sides together. Sew lining fabric into a loop (note: I actually used an old t-shirt for my lining! It's comfy and free! If you do this, cut it so this skirt is roughly 40 inches wide).
Run a gathering stitch along the bottom of your main piece and gather it till it's the width of your lining piece.
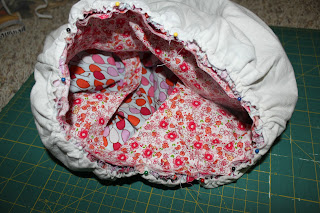
Place right sides together and sew up the bottom. It'll look like this (from the inside) after you turn it.
Run a gathering stitch through the top of the main and lining pieces. Gather them up until they're BOTH the width of your bodice.
Place the bodice inside the skirt, right sides together, lining up all your side seams. Sew them all together then finish with a zig-zag stitch.
Grab your five buttons and sew them along the neckline. Sorry it's hard to see. It was SUNNY out!!
There you have it! The double bubble!
I love bubble dresses! :)


Me too! I made a bubble dress for my daughter's Easter dress that turned out so cute! I like the bodice style on yours- so simple! Great job!
ReplyDeleteBeautiful! I will do for sure. Greetings from Brazil.
ReplyDeleteMi
This is adorable!! I have been drooling over a bubble dress Oliver and S pattern, but maybe now I won't need it!
ReplyDeleteAwesome! If you need any help with alterations, let me know!
DeleteLove it! And I love the fabric, too. I've adored the fabric since the Cottage Mama made one of her dresses out of it, but now I have another reason to love it! Thanks for the tut!
ReplyDeleteI know! The fabric is amazing! I might have to order more to make a dress for Noelle, too. Balloons, flowers, bunnies? It's an all-around winner! :)
Deletelove this dress. Thanks for the tutorial
ReplyDeleteThis is so cute, thanks for sharing!
ReplyDeletewww.blissfulsewing.blogspot.com
Simply adorable, Heather!!! Love how you've put the bow at the front...
ReplyDeleteI am in love with this darling little dress! Love the crossover back!
ReplyDeleteSooo cute, I'll have to add it to my growing pile of things to make when one of my friends FINALLY has a girl! I will have your bubble skirt technique somewhere before then though! Glad I found this via Someday Crafts =)
ReplyDeleteSo so cute!!! Thanks so much for sharing the tutorial!
ReplyDeleteUH-dorable! Love the bubble look. Great tutorial! Your little model is too cute :) Thanks for linking up to DIY Diva Thursdays!!
ReplyDeleteKara
www.mineforthemaking.com
I made the bubble dress but its not puffy? I am not sure what I did wrong?
ReplyDeleteI'm not certain what went wrong! The key to the bubbling is that the main skirt is wider than the lining and gathered in to create that bubble effect. Very weird!! What DOES the dress look like? Maybe that will help me help you figure it out?!
DeleteThis comment has been removed by the author.
ReplyDeleteHow wide do you make the lining? I couldn't find that in the directions.
ReplyDeleteAwesome dress! How would I size it up to a 7/8? Any help would be much appreciated :)
ReplyDeleteHow would you size it down to fit 18 month to 2T? Hope you can help!
ReplyDeleteVery beautiful dress. I featured it here:
ReplyDeletehttp://sewprettysewfree.blogspot.com/2013/04/double-bubble-dress-sewing-tutorial.html
Thanks,
Anshu
Cute dress, but I'm a little confused on the width of the lining??
ReplyDeleteI printed the pattern for your Double Bubble dress. Was seam allowance added to the pattern? If so, can you please tell me what it is. Thank you in advance for your assistance.
ReplyDelete