So now that we're into Spring, and we occasionally need a little more coverage than shorts give, I thought I'd whip the girls up some sweats that are comfy but also quite a bit cuter than the ones I sported during my college career. Enter, Sweetie-Bell Sweats. They have a fantastic big bell at the bottom and are made from ultra-soft knit material.
about 1 yard of knit fabric (depending on size you're making)
1/2 inch elastic
sewing gear
Instructions:
**Use a 1/2 inch seam allowance throughout. You can also finish all the seams, which is not shown here. It's knit and won't fray, so I chose the quicker option. Hehe. :)
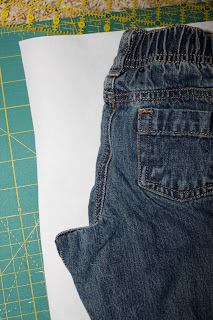
Grab a pair of well-fitting pants to make your pattern. For the front pieces, fold the pants in half and follow the curve but only extend down to the knee area. Just go straight down on the outside of the leg.
**Note: give yourself an addition inch on top to account for the elastic casing. I apologize for this misleading photo which is NOT showing that additional inch.
Flip your pants over and trace the back curve. You'll see it goes a little deeper.
You'll have two pieces that look like this.
Cut two pieces of each, making sure they are facing opposite directions. I fold my fabric and cut both at the same time. Here are both of my front pieces.
Place your front pieces right sides together. Now sew just the, er, crotch curve. Do the same for the back pieces.
It might look funny to you because the bottom part of your pants is shorter than the top, but remember, you'll be adding the "bell" to the bottom of the pants later.
Open up both pieces and pin the outside seam and inside seam together. Sew.
Flip the top over 1/4 inch then 3/4 inch and press. Pin in place because knits can get a little finicky sometimes. I also like to add a little ribbon for a tag in the back.
Sew around, leaving an opening for you to thread your elastic through. Then go ahead and elasticize!
Close up the casing.
At this point, you have some pretty cute bermuda shorts, if you want to stop there.
But if you want that sweet bell, now cut two long strips. The measurements are up to you, but here's what you need to consider. You want them to be significantly wider than your current pantleg. (My legs were 12 inches wide at the bottom.) As for length, you're adding the length that will make them fit your little one. So use those well-fitting pants to see how much longer you need to make them.
From the photo above, I needed to add 6 inches for them to be the correct length on Noelle, so I cut them 6.5 inches long and about 20 inches wide.
Sew them into a loop then run a gathering stitch along the top.
Gather until the width matches that of your pantleg.
Placing right sides together, pin and sew. Repeat on other leg.
Flip and there you go! Now you could leave them like this, or press them over to hem them.
Or you could use the lettuce stitch (oh, I heart the lettuce stitch) like I did here.
Now you are ready to stake your claim on Spring!
Or run for the sheer fun of it!
Whatever you do, you're going to be stylish and chic. :)


Hi!
ReplyDeleteYou linked up this project to the Bloglovin' Hop on my Blog. I would love it if you created an account with Bloglovin' and link it up on my blog.
http://thediydreamer.blogspot.ca/2012/04/bloglovin-hop.html
The actual From Dream To Reality - Project linky party will be online later tonight. Make sure to re-share your project there :)
Thanks so much!!
Done! I added the link to the party when I was on my phone, so I had to wait till I was on my computer to join Bloglovin'. Excited to be following you! :)
DeleteOooooh, these are so sweet! Feminine sweats...love it! I need a pair for me!!
ReplyDeleteDon't laugh when I say that I'm seriously SERIOUSLY considering making a pair for myself. ;)
DeleteI use to add material to the bottom of my pants when they got too short, even used an embroidered lion when my pants caught on fire.....Lov your stuff :-)
ReplyDeleteWhen your pants caught on fire?!? Now THAT sounds like a story! :)
DeleteSo cute and simple too! Thanks for sharing.
ReplyDelete