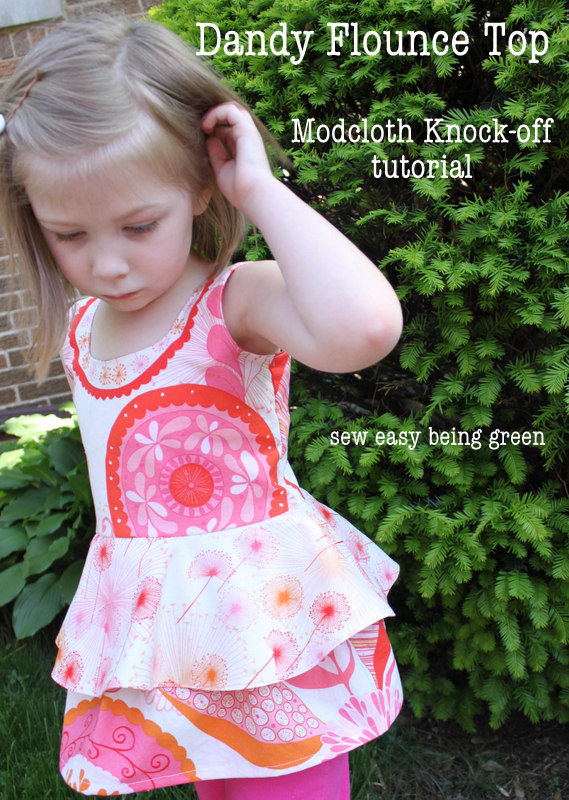
Anyone else love ModCloth? Oh my word, I could drop my entire life savings on all the fun stuff they have.
And when I saw this dress, I thought, I must make something like that. So I did. I'm a woman of my word. Ha!
I had a few things to think about, though. First, since we pretend we're puppies for a good 80% of each day, separates work better for us. Second, pencil skirts don't really seem to work for sliding and dancing and general goofiness. So a top it was. And instead of a pencil skirt, I went with an, er, paintbrush? Sure. Wanna make one? Follow me!
Materials:
1/2 yard of main fabric (for size 4T)
1/2 yard of coordinating fabric
1/4-inch elastic
sewing gear
Instructions:
Use 1/2-inch seam allowance throughout.
I made my pattern pieces using Riley's measurements, like I did here. You can also use a well-fitting top, too. The key is that the neckline needs to be big enough to fit over her head when you finish. Make your neckline slightly squared off. And there should be some wiggle room in the waist. My pieces are all 12 inches wide, creating a 22-inch waist once they're sewn.
I cut one front and one back bodice piece then front and back lining pieces that were slightly shorter than the main pieces (so the bodice will be partially lined).

Pin and sew your main pieces together at the shoulders. Do the same with your lining.

Press the seams out and clip at the corners.

Flip right side out, press and topstitch.
P.S. I love how this kind of looks like a necklace. Great fabric, right? :)

For the armholes, fold both sides evenly to the inside. This can get a little tough, but you can do it. You can also clip the curves here.

And I use lots of pins once I get them lined up.

Topstitch close to the edge.

Now take your lining pieces and fold them 1/4 inch then another 1/4 inch. Sew.

The inside of your bodice will look like this.

Sew up the side seams (then finish with a zig-zag), main and lining pieces, and flip right side out to get this:

I then press that arm seam to the back and secure it with a few little stitches.


Make a basic selvage-to-selvage gathered skirt that it 9 inches long. Gather it to your bodice width and set aside.

Using Dana's circle skirt tutorial, make HALF a circle skirt. For the length, go out 8.5 to 9 inches from the center. You'll see my waist circle was cut with 3.5-inch radius, so my flounce with end up being about 5 inches.

For the back of the circle, start with the same radius but then extend it out. Cut TWO of each of these pieces, so you can line the flounce.

Stitch front and back pieces together and press seams out. Do the same with the lining. Then place right sides together and stitch all the way around the outside of the "circle."

Instead of clipping around all those curves (yuck!), take pinking sheers and cut close to the stitches.

Flip, press and topstitch.

Assembly time!! Pin your flounce, right sides together, to your bodice. Then pin the gathered skirt, outside both of them, wrong side facing out. VERY carefully sew them all together.

When you flip it right side out, you have this!

I wanted my bodice to be slightly more fitted, so I drew 2 4-inch lines with fabric pen, right below the lining. I then cut two 3-inch pieces of 1/4-inch elastic.

Run a straight stitch along the elastic, pulling from in front and behind as you go. Inside:

Outside:

Yay! Congrats! You're done!

And the back of this dress is the real money-maker. I might need one for myself! :)

that is so cute!
ReplyDeleteadorable! great job. how fun has the sew along been? sad it is over, but it has been a lot of work.
ReplyDeleteI know! It's given fun focus to my sewing! I actually had decided not to do this week because I'd been overwhelmed with stuff, but then I made these tops and thought, "Alright, I'll just post those. Couldn't hurt!" :)
DeleteWhat a pretty dress, who wouldn’t love it!you have great talent!
ReplyDeleteHi Heather
ReplyDeletewow this is so beautiful! You have a wonderful skill and are putting it to good use!
I would LOVE if you stop over at our Crafty Saturday Showcase and linked up this project. It runs from Sat-Thur at noon. Then our designers pick our favorites and feature them on Friday. This would go great in the collection!
We also have a linky for ETSY/Business craft link up.
Link: http://bowdabrablog.com/2012/05/19/saturday-showcase-craft-projects-2/
Hope you are having a great weekend,
Susie Bowdabra
That dress is so pretty. Thank you for your tutorial! I found you at sarahndipities and just had to come over and take a look at your blog, I like it!
ReplyDeleteVery cute! I love Modcloth, too. Thanks for sharing at our Handmade Tuesdays party.
ReplyDeleteSo cute! I love the bright colors and bold pattern!
ReplyDeleteSuch an incredible little dress. I would have dropped a fortune on a frock like that at a boutique when my girls were little! Spotlighting your post on my FB page today.
ReplyDeleteJenn/Rook No. 17