I like to use the A-line dress as a canvas for any number of cute embellishments. It's pretty simple, it has a nice flat front (and back) to work with, and it's easily tweaked into lots of different looks.
See... this is an A-line, shortened to a top...

...here's a sleeveless one...

...and we're familiar with Noelle's Valentine-y dress, also A-line.

So, clearly, I have to do a tutorial on it.

I'm going to use Riley's Valentine's Day dress for this tutorial, on the basics of the toddler A-line.
Then we'll have a separate post to show all the fun details. Sound like a plan? Good!
Materials:
About 1 yard of fabric (for size 3T/4T... you may need more or less, depending on your size)
Button
Elastic hair tie
Homemade or store-bought bias tape
Basic sewing gear
Cutting the Pattern:
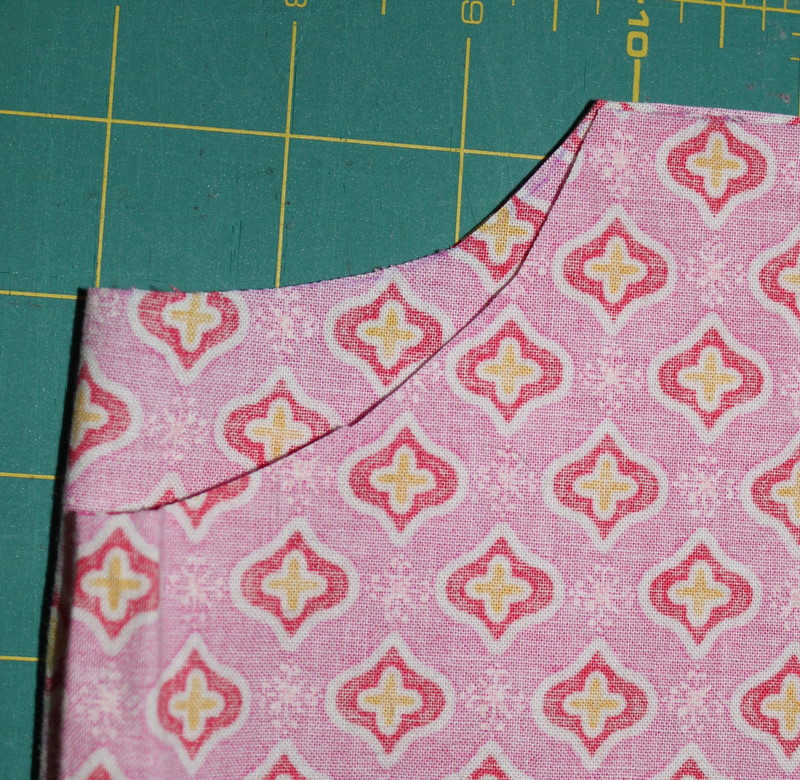
First, you need to make your pattern. Find a shirt or dress that fits your recipient well, not too loose and not too tight. Fold it in half and trace around the neck and armholes, leaving about a half inch for seam allowance.

I kind of play connect the dots, like this... :)

From the armpit of your pattern, angle out slightly to create your A-line. See how easy so far?

**A note on your tracing paper. I didn't buy freezer paper for a while because I could only find it in this gargantuan container, and it just seemed like a little much to me. However, I finally got some, and HOLY COW, it's an awesome tool. The sheets are pretty darn big, and it's nice and sturdy. I really recommend it. It's what I use to make all my patterns.**
Now for the sleeves. Don't be scared of sleeves. Heaven knows I was. But now that I feel comfortable about 'em, I love 'em. It just takes a little practice. If you're just starting, don't worry. You can totally do this.
Here's how to make a sleeve pattern. Take that pattern that you just made. Use the armhole to get the curve of the sleeve, like so...


Then add a little "tail" to the end of it like this.

From there, you just extend the sleeve out to your desired length. I want mine to be a 3/4 sleeve, so I went 8 inches from the top of the sleeve.

Take your two pattern pieces (the main dress and the sleeve) and cut two of each, on the fold. Make your front neckline a little lower than the back, like your model shirt was.

Now, to get all of our cutting out of the way, you want to cut a strip of bias tape (if you aren't using store-bought). If you want to make a whole load of bias tape, here's a great tutorial from Katy at no big dill. But you won't need that much-- 18 inches will actually be plenty. So make some double fold bias tape.
Then-- last piece to cut!-- cut a rectangle that is 3 inches by 5 inches.

Whew. Now we're done with my least favorite part-- cutting. Let's get to assembly! I heart assembly!
Assembly:
Zig-zag stitch around the two long sides and one short side of that little rectangle you just cut.
Find the center of the unfinished edge. Draw a straight line down the center, stopping about an inch from the bottom.

Now find the center of the back of your dress. Right sides together, pin the rectangle, with unfinished edge to the neckline, lining up the centers.

Starting at the neckline, stitch 1/8-inch from the line. When you get to the end of the line, start stitching up the other side, again 1/8-inch from the line. STOP about 2 inches from the top and put your needle down and lift your presser foot.
With your fabric still in your machine, cut down the line, making sure to NOT cut the stitches, about 3/4-inch. Then take your elastic hair tie and insert it in there. The loop that is in between your fabric should be a little smaller than your button. The loop should be a teensy bit over 1/2-inch from the neckline.
*I took my fabric out of my machine to give you a better picture. Don't actually do this.*


Once you have your loop in place, put your presser foot down and continue sewing up, 1/8-inch from the line. Obviously, you'll catch your elastic, securing it.
I like to keep a little of the elastic out, so it stays in place better. Plus, you won't see it after you flip the rectangle to the other side.
Cut down the rest of your line and cut two little angles out at the bottom, but don't cut through your stitches!

Then flip the rectangle over to the wrong side, press and topstitch. Now all your button closure will need is a button!... but we'll do that later.

Sew your front and back piece together at the shoulders. Finish with a zig-zag stitch.

Now take your bias tape. Fold one edge down and start pinning it around your neckline. Make sure you catch the raw edge of your rectangle as you go. When you get to the end, fold that edge down, so you have nice finished ends at that back slit.

Now sew the bias tape in place. Now your neckline is done. Yay!

Time for sleeves. First, place two marks (or pins) 1.5 inches from the top center of the sleeve. Now run a gathering stitch from one mark to the other. Don't gather yet, though.


Pin both sides of the sleeve along the armhole, up to your gathering stitch.

It will poof up a little, like this:

Now you'll grab one of the threads of the gathering stitch and pull it until your sleeve fabric lines up with the armhole fabric. Adjust your gathers so they're even. I like to concentrate them more in the middle.

Now it lies flat...

Now slowly and carefully stitch the sleeve onto your dress, avoiding puckers in the fabric. If you're just starting on sleeves, take your time!
Before I zig-zag stitch, I like to flip it over to check that I didn't accidentally catch any fabric I didn't want to. And... lovely! Now I can finish it off. Repeat these steps for your other sleeve.


**If you want to make the contrasting flair flare sleeves, go here now!**
Now all that's left is to sew up the sides of the dress and bottoms of the sleeves, and add a button! Then finish your sleeves and bottom hem by flipping over 1/4 inch then another 1/4 and sewing. Or... here's where you can add fun details! But THAT'S for another tutorial! Now go get 'em, Tiger!

... I don't know where that tiger thing came from. I apologize. But I am really excited for you to make your dress. :)
Great tutorial! I can't wait to get started on my own!! I passed an award on to your blog today...check it out!!
ReplyDeletehttp://littlebeckyhomecky.blogspot.com/2012/01/feeling-love.html
Katie
INCREÍBLE tutorial ,heather,entre en su vestido 343 , y SORPRESA!! no puedo esperar para practicar el angulo de esa manga .No me guio por sus medidas,porque no se cuanto miden las pulgadas,pero su tutorial es tan BUENO, que me puedo hacer la idea de centímetros.GRACIAS.El horoscopo Chino acaba de comenzar y yo soy Tigre.
ReplyDeleteI made a dress thanks to you!
ReplyDeletecute girl and cute a line dress
ReplyDeleteI know you made this awhile ago, but thanks for doing so! I want to try making one tonight! :)
ReplyDeletewow good stuff.. I cant wait to try on my own....
ReplyDeleteI'm about to make one similar for halloween. My daughter wants to be mavis!!!!
ReplyDeleteThank you for this post. I followed it to put button and loop in an A line dress for my lil girl.
ReplyDeleteThis comment has been removed by the author.
ReplyDeleteHi great readinng your blog
ReplyDelete